|
Crochet version
|
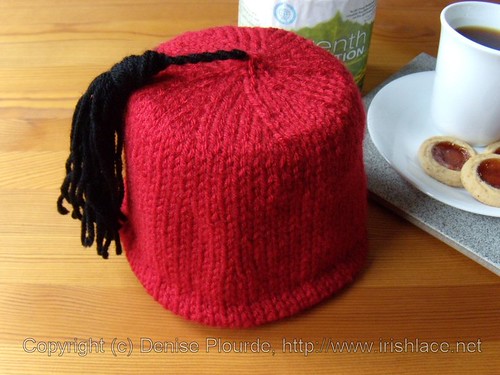
Because toilet paper covers are cool.
Dimensions: To fit your roll of toilet paper. The sample measures 5" in diameter by 5" high (13cm by 13cm)
Supplies:
Needles: To give you a fabric you like with the yarn you're using. The cover is worked entirely in the round, so you're looking for DPNs or circs or both.
Yarn needle: To weave in ends
Stitch markers: scraps of yarn in a contrasting color work nicely. You'll want one to mark the start of the rounds and 8 more (different style) to mark the pattern repeats
Toilet paper roll: Yep. This is another example of couture toilet roll fashion. Custom made to fit that particular roll.
Yarn:
Vanna's Choice, Color 113, Scarlet: one skein (the sample used about 1.5oz/75yds)
Vanna's Choice, Color 153, Black: small amount for optional tassel (the sample used .1oz/5yds)
The sample used about 1.5oz/75yds red yarn (worked fairly loosely on 5mm needles) and .1oz/5yds black. If your roll of toilet paper is larger or you work more tightly, you may need more yarn.
Pattern:
This is worked from the top down. My condolences. The good news is that it's almost all knitting, no purling. (You could do it entirely without purling, but that would mean having 5 stitches on 3 DPNs, and that's ugly. It's that or five purl stitches - knitter's choice!)
A note on increases: the sample was made using right lifted increases ("rlinc"), where you knit into the stitch below the one on the left needle. If you prefer to use a different increase, that's fine, but be aware that this may throw your stitch count off. In particular, if you use kbf/kfb, substitute that for "rlinc, k1", not just for "rlinc".
Abbreviations:
k: knit
rlinc: increase by knitting into stitch below the first stitch on the left needle
pm: place marker
sm: slip marker
Top:
With red, cast on 5 stitches.
Row 1: Purl across.
Row 2: k1, rlinc, k1, rlinc, k1, rlinc, k1, rlinc, k1 (=9 sts)
Distribute on 3 DPNs (if that's what you're using) and join (without twisting) to work in the round. Use a stitch marker to mark start of round
Round 3: knit
Round 4: *rlinc, k1, pm, repeat from * to last 2 sts before round marker, rlinc, k1, slip marker (=18 sts)
Round 5: knit, slipping markers as needed
Round 6: *k1, rlinc, k1, sm, repeat from * to last 3 sts before round marker, k1, rlinc, k1, sm (=27 sts)
Round 7: knit, slipping markers as needed
Round 8: *k2, rlinc, k1, sm, repeat from * to last 4 sts before round marker, k2, rlinc, k1, sm (=36 sts)
Round 9: knit, slipping markers as needed
Repeat rounds 8 and 9 as needed, increasing the number of knits before the increase by one for each even round. The total stitch count grows by 9 for each increase round, and you'll repeat these rounds until the circle is just slightly larger than the roll.
Math time!:
1. Count the number of stitches you have in a round _____
2. Is this evenly divisible by four? If not, work one more round, increasing 1, 2 or 3 times, to bring the number of stitches to a multiple of 4. Write the new number here _____
3. Divide by 4 _____
Stitch Marker Shuffle:
Keeping the Start-of-Round marker in position, remove the other eight markers, and place three markers, every _____ stitches. (Refer to step 3 of Math time! for the number of stitches between markers.) If you don't want to do this as a separate step, you can do it while knitting the first round of the sides.
Sides:
Rounds 1-7: k around, slipping markers as needed
Round 8: *k to one st before marker, rlinc, k1, repeat from * 3 more times (=4 sts increased)
Repeat Rounds 1-8 until the fez is tall enough to cover the roll. Work another few rounds (three, perhaps - .5"/1cm or so). Bind off, removing stitch markers. Break yarn, weave in ends. Fold the bottom edge up .5"/1cm and hem. A whipstitch catching every other bound-off stitch and every other purl bump should work nicely.
Admire.
Make optional tassel.
Tassel
1. Wrap yarn around toilet paper roll a dozen times or so. Cut yarn.
2. Cut another piece of yarn about 18"/50cm.
3. Tie ends together.
4. Slip this yarn loop under the loops on the roll.
5. Hold one end of the yarn loop still, and put your index finger into the other end of the yarn loop. (Take a look at the ply of the yarn. If it's plied S, use your right hand. If it's plied Z, use your left hand.)
6. Twirl your finger in a sort of "whoopdedoo" way to twist the yarn. (If it looks like the plies of yarn are separating rather than getting more tightly twisted, switch hands.)
7. Keep twirling.
8. And twirling.
9. If you see the yarn start to kink, that's a good sign. Twirl a bit more, then bring the two ends together.
10. They'll start to coil around each other. This is good.
11. They'll spin the roll of toilet paper in the process. This is entertaining.
12. When things look stable, check the twist. If it looks good, knot the two ends together with an overhand knot. Otherwise, pull the ends apart (more toilet paper spinning, yay!) and twist the yarn some more.
13. Slide the dozen loops off the roll, then tie an overhand knot at the point where the loops meet the cord. (It's easier to do this by tying the knot very low on the cord than by trying to tie the loops themselves.)
14. Cut loops
15. Attach tassel to fez by feeding knot through the center hole. The overhand knot will anchor it.
So there you have it. A toilet paper cover that's sure to be admired by all. Because fezzes are cool.
|
|