Knit version
So what do you do if you want to have a spare roll of toilet paper easily available, and want to protect it from dust, but that's all?
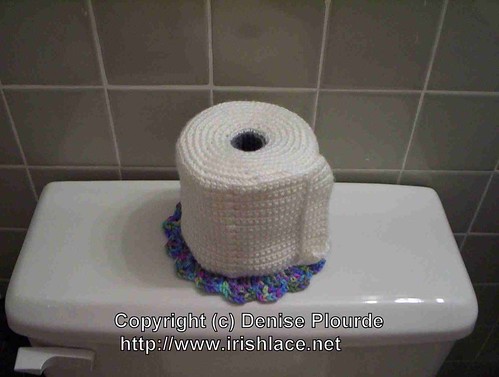
Toilet Paper Roll Cover
Dimensions: To fit your roll of toilet paper. The sample measures 5" in diameter by 4.75" high (13cm by 12cm)
Supplies:
Hook: US H8/5mmYarn needle: To weave in ends
Stitch markers: safety pins, bobby pins, scraps of yarn - at least one, possibly more as needed (If you buy official stitch markers, be sure to get split rings or safety pin types. Unbroken ring markers are good for knitting, but not for crochet.)
Toilet paper roll: Yep. This is couture toilet roll fashion. Custom made to fit that particular roll.
Yarn:
Caron Simply Soft, Grey Heather 9742 - small amount
Caron Simply Soft Holiday, White 0001 - one 3 oz skein
The sample used about 2.5 oz of white yarn and .5 oz of grey yarn. If your toilet paper comes in large rolls, you may need more yarn.
Pattern:
The basic idea of making a circle is that you increase the number of stitches in each round by the number of stitches that you had in the first round. So if you have 8 sc in the first round, the second round will have 16, and the third round will have 24, and the fourth round will have 32 and so on. You do this by working 1 stitch into a certain number of sc from the previous round, then working 2 sc into the next stitch. So if you have finished the 5th round, you have 40 stitches, and you want to increase to 48. You would work four sc in a row, then work 2 sc into the next sc, then four more sc, then another increase.
Use common sense, though. Put the circle down occasionally. If it is cupping, you need to work more increases. If it is ruffling, you need to work fewer.
And do NOT be afraid to frog. It's just yarn.
Center base:
With gray, chain 4 stitches, join in a ring.
Round 1: Chain 1, work 7 sc into ring, join with a slip stitch in first chain. (=8sc)
Round 2: Chain 1, work sc into same stitch as joining, work 2 sc into each sc around, join with a slip stitch at top of first chain (=16 sc)
Now, you need to make a decision. Do you want the center to be flat? If so, continue working in gray and increasing until the circle is about
the diameter of the tube, cut the yarn, and weave in the ends. If, however, you want it to be three dimensional, check the circle against the diameter of the toilet paper center. It should be almost as large as the tube, yet still be small
enough to fit into the tube. When it is the right size, make a note of how many stitches you have, and continue to...
Center sides:
Round: ch 1, work sc into each sc in previous round, join with a slip stitch in first chain
Repeat until the tube is approximately 2"/5cm long. Cut yarn, weave in ends. Turn tube inside out, so "right" side is inside.
Paper side:
With white, join yarn to back loop of one of the gray sc. Huh? You've made a tube of gray yarn. At the edge of the tube you see the front loops and back loops of
the last round you did in gray. Join the white yarn to one of the back loops. Attach a stitch marker to the front loop of the gray stitch.
From here, we will work in spirals, and will work in the back loop only to get that swirly look.
Spiral round: using the numbers for the last center base round as a starting point, work around in sc in the back loop only,
increasing as appropriate.
For example, if your last center base round was "2sc into every sc",
your first spiral round will be "*sc into next sc, 2sc into next sc, continue from * until you reach the stitch marker". When you get to the stitch marker, you will start working "*sc into each of next 2 sc, 2sc into next sc,
continue from * until you reach the stitch marker"
Again, use common sense, and put the circle down occasionally to check how flat it is.
Check the work against the roll of toilet paper. Once it is a bit larger than the roll, stop working spirals. Chain a few stitches;
5 or 6 will do nicely. Turn work, because it's time to start...
Paper:
Count the number of stitches you have, including the 5 or 6 extra: ________ Now divide that by 4: _______
(round up or down as needed) This is where you will place stitch markers, and that's where the perforations will be.
For example, if you have 72 stitches, and chain 5 additional stitches, you'll have 77 stitches. Divide that by four, and you'll have
19.25. Round that down to 19, and you'll place stitch markers every 19th stitch. You may be one or two stitches short for the
last segment, or you may have one or two extra. It's fine: that's the area that will go under the flap.
And if anyone is looking that closely at this thing... I would hope to heck that that person is a crocheter.
Send 'em here!
Row 1: sc into 2nd stitch from hook and each stitch of chain, and into the front loop of each sc in the spiral. Mark the back loop of every X stitches (this is the number you just calculated).
When you run out of front loops, turn work. (Again, having one or two stitches more or less at the very end isn't a problem. Carry on.)
From here on in, you'll be working into both loops.
Row 2: Chain 1, *sc into each sc in the preceding row. When you come to a marked stitch, skip that stitch. Chain 1, and sc into the next sc. Repeat from * around.
Row 3: Chain 1, *sc into each sc in the preceding row, slip stitch into the chains of the preceding row (see note), repeat from * around.
Note: I found that the perforations looked better if I skipped the sc just before the chain, and worked the sc and
slip stitch into the chain space. The fact that I frogged that section and redid it several times before I came up
with perforations that met my standards is either a testament to my perfectionism, or a sign that I take my kitsch far too
seriously. If you are equally exacting, try working the sc and slip stitch into the chain space. I think you'll like it.
Repeat Rows 2 and 3 until the "paper" is tall enough to cover the roll. Crochet the paper together, with the flap end on the outside. (I used the same crochet hook and slipstitched them together.
Or you can hand sew it. Whatever feels right.) Break yarn, weave in ends. Remove stitch markers.
Admire.
Make Kitschy Doily.
Kitschy Doily
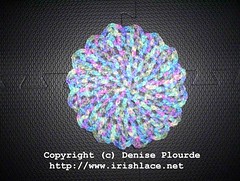
Dimensions: To suit your needs. The sample measures 6.5"/17cm
Supplies:
Hook: US H8/5mmYarn needle: suitable for the yarn you're using
Yarn:
Red Heart Supersaver Multicolor, 0310 Monet
The sample used about .5oz/15g yarn.
Pattern:
This is inspired by Elizabeth Zimmermann's Pi Shawl, which was inspired by mathematics. If you have 8 stitches in the first round, you'll have 16 in the second round, and 32 in the 4th round and 64 in the 8th round. This agrees with what I said above about increases. The neat thing is, though, that you needn't do those increases every round. If you have a lacy pattern, you can lump a bunch of increases together and then work even for however many following rounds. So you would have 8 stitches in the first round, 16 in the second, 32 in the third, and 32 in the fourth. Increase again, in the 5th round to 64, but then work the 6th, 7th and 8th rounds even. It's pretty cool, really.
Doesn't sound very kitschy, though, does it? Don't worry, the worsted weight acrylic will make up for it.
Doily:
Chain 4 stitches, slip stitch to join in a ring.
Round 1: Chain 4, *dc in ring, ch 1, repeat from * 6 more times, join with a slip stitch in third chain of chain-4 (=8 dc)
Round 2: Chain 4, dc in same space, ch 1, *dc in next ch-1 space, ch 1, dc in same space, ch 1, repeat from * around, join with slip stitch in third chain of chain-4 (=16 dc)
Round 3: Chain 4, dc in same space, ch 1, *dc in next ch-1 space, ch 1, dc in same space, ch 1, repeat from * around, join with slip stitch in third chain of chain-4 (=32 dc)
Round 4: Chain 4, *dc in next ch-1 space, ch 1, repeat from * around, join with slip stitch in third chain of chain-4 (=32 dc)
Round 5: Chain 3, dc in same space, ch 1, *2dc in next ch-1 space, ch 1, repeat from * around, join with a slip stitch in top of chain-3.
Round 6: Chain 2, dc into next ch-1 space, ch 1, dc into same space, ch 1, *sc into next ch-1 space, ch 1, dc into next ch-1 space, ch 1, dc into same space, ch 1, repeat from * around, joining with a slip stitch in the first chain of starting ch-2.
Okay, that's fine, but what if you want a larger doily? Well, Round 3 is an increase round, Round 4 is a work-even round.
If you want to make the doily larger, just repeat those rounds as needed. Any round that is 1 plus a power of 2 is an increase
round. What does this mean? Let's look at the numbers:
20 + 1 = 1 + 1 = 2
21 + 1 = 2 + 1 = 3
22 + 1 = 2 * 2 + 1 = 4 + 1 = 5
23 + 1 = 2 * 2 * 2 + 1 = 8 + 1 = 9
24 + 1 = 2 * 2 * 2 * 2 + 1 = 16 + 1 = 17
25 + 1 = 2 * 2 * 2 * 2 * 2 + 1 = 32 + 1 = 33
26 + 1 = 2 * 2 * 2 * 2 * 2 * 2 + 1 = 64 + 1 = 65
27 + 1 = 2 * 2 * 2 * 2 * 2 * 2 * 2 + 1 = 128 + 1 = 129
28 + 1 = 2 * 2 * 2 * 2 * 2 * 2 * 2 * 2 + 1 = 256 + 1 = 257
So Rounds 2, 3, 5, 9, 17, 33, 65, 129, 257... They're all increase rounds. All other rounds are worked even.
Again, though... Use common sense. If this doily is starting to look like an exercise in crocheting the hyperbolic plane, you don't need to increase that often. Unless you want a hyperbolic plane doily. But you're on your own for that.
So there you have it. A Toilet Paper Cover that doesn't try to hide what it's hiding. And a Kitschy Doily to place it on.
If you are on Ravelry, you can see the page for this pattern at http://www.ravelry.com/patterns/library/toilet-paper-roll-cover-and-kitschy-doily